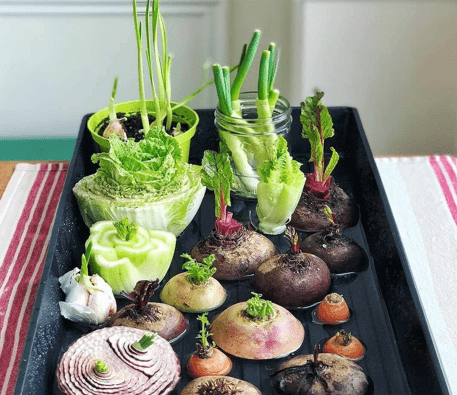
5 Vegetables You Can Grow Using Leftovers
With no seeds, just pieces you might throw in the trash, you can easily grow vegetables at home.
Pieces of vegetables that you usually throw in the trash can be planted and give quick results without much reference – just water, light and patience.
Soon, without buying seeds, you can have a small organic vegetable garden at home and at the same time an interesting activity for children. There, watching the plants grow day by day, they will learn about the concept of recycling and the origin of food.
Soon, without buying seeds, you can have a small organic vegetable garden at home and at the same time an interesting activity for children.
- Lettuce
Planting:
Cut the lower part of the lettuce to a length of 2-3 cm and plant it in low pots and planters 20-30 cm deep. If we want to plant more lettuces, we place them at distances of 20-30 cm between them. Then we put the pot in a spot with sun or in some semi-shaded position. Although we can do almost all year round, the best time is from early October to early December and early February to mid May.
Watering:
Lettuce has significant water needs and needs frequent watering to keep the soil in the pots relatively moist. Water every 2-3 days and make sure not to pour too much water into the pot.
Harvest:
Lettuce will grow about 2 months after planting, depending on the prevailing weather conditions, as well as the variety of lettuce. We can harvest our lettuces by cutting the whole plant from the root with a knife. If we are in a hurry or want a longer harvest period, we can gradually cut the peripheral leaves of the lettuce when they grow, depending on the quantity we want for our salads. In this way, we leave the central leaves of the lettuce to get a bigger size and cut them in the next harvest.
- Onion
Planting:
For the onion, cut the lower part of the spring onion to a length of about 2 cm along with the root and plant it in a pot or planter with a shallow depth of 15-20 cm and a large surface, in order to separate enough plants. The planting of the lower part of the fresh onions is done at a depth of 1-2 cm and at a distance of about 5 cm, if it is a fresh onion crop, or at a distance of about 7-10 cm, if it is a dry onion crop. Then we place the pot in a spot with sun or in some semi-shaded position.
Watering:
Potted onions need regular light watering every 2-3 days, as they have a superficial root system. By watering the onion we must constantly ensure moisture in the surface layer of the planting. Of course, excessive watering can cause onion bulb rot.
Harvest:
When we grow for fresh green onion in the pot we harvest it, uproot it, about two months after planting, when the green shoot of the onion reaches 20-30 cm, while the underground part of the onion has acquired a cylindrical shape with a diameter of 1-1 ,5. centimeter. When we grow for dry onion in a pot, the harvest takes place about 4 months after planting, in the middle of summer.
- Garlic
Planting:
We take the cloves from the garlic we buy, the external plantings at a depth of 2-3 cm, with intervals of 10-15 cm between them. The appropriate season for planting garlic, in the warmest places, starts in the October – November season, while in the coldest and mountainous ones, in the February – March period. Garlic thrives in cool weather during foliage development and warmer temperatures during bulb formation.
Watering:
As for watering, garlic is relatively drought tolerant and doesn’t need water very often. Excessive watering, especially after planting, can rot our plant. Also, in the spring, 2-3 weeks before the final harvest stage, watering should be stopped to allow the garlic heads to mature properly.
Harvest:
Fresh garlic is harvested 2-3 months after planting, when the height of the foliage reaches about 20 cm. Dry garlic is harvested 6-8 months after planting, when most of its leaves turn yellow and droop to the ground. We take the bulbs out of the pot and leave them on the soil to dry them and cover them with their dried leaves, so that we don’t have problems from the sun.
- Chives
Planting:
We can cut the lower part of the chives, 2-3 cm long, together with the root and plant in planters or pots 20-30 cm deep, at distances of about 20 cm between them. Chives need a cool environment, they are resistant to cold and in sunny places they show better growth and production.
Watering:
Chives love a cool environment, so we water regularly every 2 days, especially during spring and summer, and we are careful not to let the soil dry out for too long.
Harvesting: Chives, as a perennial plant that does not lose its foliage in winter, allows us to cut leaves all year round. Harvesting of its leaves can begin one month after transplanting the plants or two months after sowing. In the first year we can do 3-4 harvests, while in the following years we can harvest leaves once a month. When harvesting, we cut the leaves from the base of the plant, 4-5 cm above the soil, so that our plant can soon grow again lush vegetation. We should note that the flowers of chives, which bloom in May-June, are also eaten.
- Celery and celery
Planting:
Cut the lower part of the celery or serir to a length of 2-3 cm and plant it at a depth of about 5 cm, in a pot 20-30 cm deep. If we want to plant more plants, we place them in a planter and at a distance of 20 cm between them. To have healthy green foliage, celery needs a cool environment and sunny or semi-shady places with temperatures of 16-20°C.
Watering:
Celery and celery need regular watering every 2-3 days to ensure nutrition in the soil of the pot. If the watering becomes less frequent and we do not have a cool soil environment, the celery that starts to become bitter, while its shoots are not as crisp, as they acquire fibers inside.
Harvest:
Celery and the whole need at least 3-4 months, after planting, to get sufficient foliage and crisp shoots, so that we can cut it and use it in our kitchen.